Sculpture and Ceramics
Unconventional Material Piece
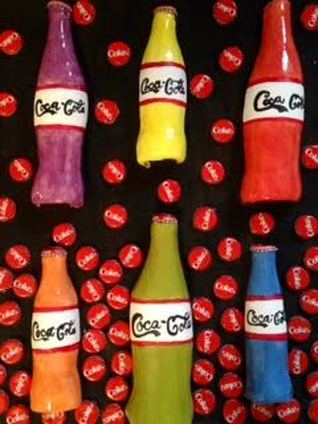
For this project, we were all asked to choose a brown paper bag with a random item inside. While we were not confined to this item, whatever it was had to be utilized somewhere in the final piece. The bag I chose contained a ton of coke bottle caps. Everyone was saying how they wanted that material and I was excited about it at first. However, while staring at a pile of red soda caps, I was uninspired. I played with the ideas of making some sort of vintage themed piece as well as making a large coke bottle out of the caps. That gave me the idea to make clay coke bottles and once I had that idea, there was no going back. I was not sure exactly how I would utilize the caps, my actual unconventional material, but I was too excited about my plan.
I got right to work creating a total of 6 bottles. I had two different sized actual coke bottles and used those as hump molds to create 3 small ones and 3 larger ones (only the front half). Creating these was definitely the most challenging part of the project as I struggled to get the clay slabs to cover the bottles correctly. I had to make sure that the clay was rolled out thin enough and that I sprayed plenty of cooking spray on the bottles to prevent sticking. It got very messy, and by the time I would be finished with one, the clay was too soft to support itself and would fold in. After many attempts, I got the hang of it and am happy with how they turned out. I glazed them each a different bright color and left room to create knock-off coca cola labels by hand. The printing on them is not perfect, but that makes it unique. I added red strips to the "labels" as well to distinguish the white of the blank space and the bleeding color.
Then came deciding what to do with them and how to use my given material. I decided to mount them to a board that I painted black to provide a nice contrast with the bright colors of the bottles. I used aviation snips to cut bottle caps in half and I hot glued them to the bottles. Then, I arranged the bottles in an Andy Warhol inspired pattern. Finally, I added the rest of the bottle caps in a pattern in the background using hot glue to create the effect of fizzing soda.
I am really happy with how this piece turned out. It was a lot more successful than I had originally thought it could be since I did not have a clear plan at the beginning. I think the bright colors work really well together and definitely reflect my style. I also like how the red is carried throughout with the labels on the bottles themselves as well as in the background. I believe I have a much stronger understanding of what makes a relief piece successful after completing this project. I think the only thing I would do differently next time would be to spend a little more time on the bottles as some of their bases are not very flat to remain mounted. Other than that, I think this was a very successful piece!
Installation Piece
|
|
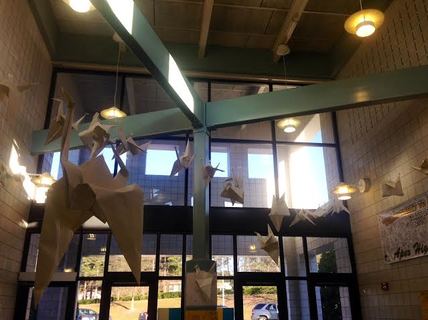
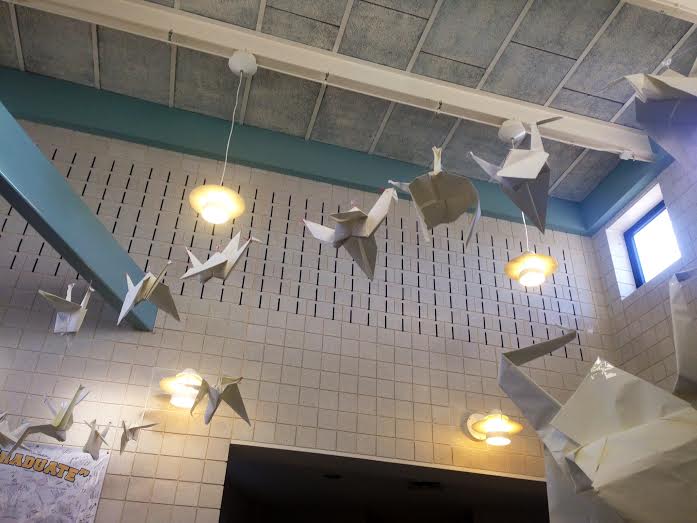
As a side assignment, we worked for a couple days in class making paper origami cranes. Every student made a few of all different sizes. I had made cranes before but never on such large scale, plus it had been a while so I had to remind myself how to make them. Once all the cranes were complete, we had all these birds but no one had a great idea of what to do with them so we had a giant brainstorming session to come up with what kind of installation piece we could do in our school. The most popular idea was to create a hanging sculpture, similar to the one in the NC museum of art, in the shape of a V pattern that birds would create when flying. We tied loops on the tops of the cranes and cut long pieces of clear string to thread through the loops. We formed the pattern we wanted to make on the ground of the lobby of school and and after working together to lift them up, tied the stings around poles. The pattern stayed in place and it made the illusion that the birds were flying. This was a really cool project because it was something unlike anything I had done before. It was really neat to work with the entire class to create a piece that the whole school can enjoy. I definitely learned a lot about working with others and incorporating everyone's ideas. I think it would be neat if Apex's art department did a lot more stuff like this because it definitely adds an artistic touch to the school!
Tray and Cup
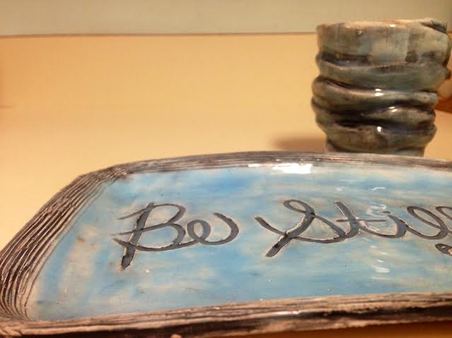
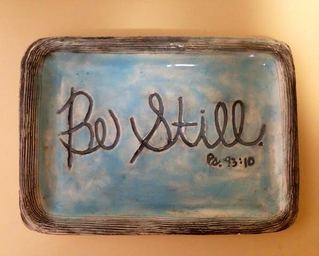
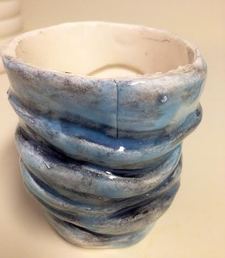
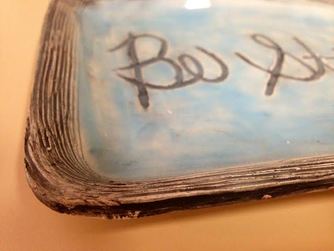
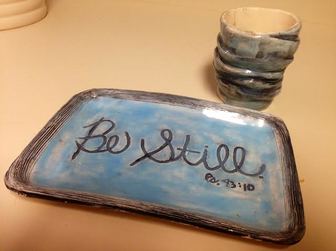
To get some practice with clay, we had a mini assignment of creating a matching set of trays and cups. We actually used meat trays from the grocery store as the mold for our for our own plates and styrofoam cups as the mold for our cups. I decided to make mine pretty simple as I just wanted to mainly test out one technique, the under glaze, and didn't want to distract from that. I did make my tray unique, however, by using a scoring tool on the raised edges. It gave the tray a very cool texture and looks even and neat. I then used a pencil and sketched in two words my favorite bible verse. The places that were carved into in those two places were perfect for the under glaze that I had been wanting to try. I used black and then chose a light blue for the plate to create a nice contrast. For the cup, I tried a ribbon technique in which I cut strips of rolled out clay and layered them to form the shape of a cup. The crevasses of the ribbons created nice places for the under glaze as well, so the two pieces match very nicely together. This simple project was really fun because I haven't worked with clay that much this semester. In addition, I was able to make something useful with a unique touch. I am happy with how it turned out and am thankful for the opportunity to work with clay!
|
|
|
|
Vessel
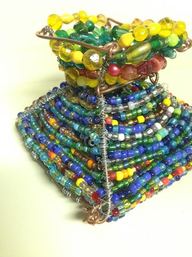
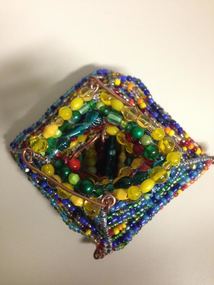
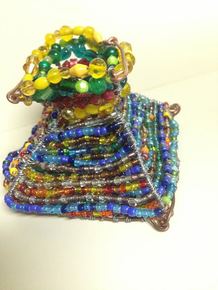
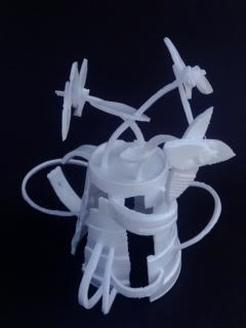
When the class was introduced to the vessel project, everyone began thinking about the clay vases and mugs and such that they could make. I knew that I wanted to do something different and use a medium that I did not have much experience with. I used to make a lot of jewelry when I was younger so I have so many beads leftover that I thought about using. This, along with my love of strangely shaped things helped me decide to make a vase out of the beads and wire.
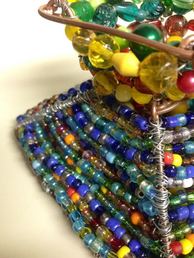
I really struggled getting started with this project. I obviously was not following a pattern or anything so I had to think through how to create the form that I wanted and get the beads to stay on. There was a lot more technical stuff put into it then I had anticipated. I definitely got into a routine the more I got into it, however, once I got to putting on the top part, it got even more complicated. The beads got heavier and heavier to the point where it began drooping. I am really happy that I went with my original idea and did not scare away from it. I think it could have been executed a little better, but I learned a lot about trial and error and how to be more technical with my pieces, which is something I have not experienced much with. I learned about trying new materials no matter how uncomfortable with them you are and making them transform into something really unique. I still have a lot of beads left so I think at some point it may be fun to make a whole series of various vessels similar to this one!
I really struggled getting started with this project. I obviously was not following a pattern or anything so I had to think through how to create the form that I wanted and get the beads to stay on. There was a lot more technical stuff put into it then I had anticipated. I definitely got into a routine the more I got into it, however, once I got to putting on the top part, it got even more complicated. The beads got heavier and heavier to the point where it began drooping. I am really happy that I went with my original idea and did not scare away from it. I think it could have been executed a little better, but I learned a lot about trial and error and how to be more technical with my pieces, which is something I have not experienced much with. I learned about trying new materials no matter how uncomfortable with them you are and making them transform into something really unique. I still have a lot of beads left so I think at some point it may be fun to make a whole series of various vessels similar to this one!
|
|
|
|
Dwelling
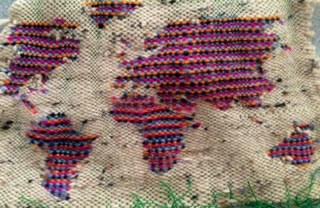
When introduced to the dwelling project, I was puzzled as to what to make. I decided to start formulating ideas by determining that I did not want to make a literal dwelling- something that someone or some creature could live in. I somehow came up with the idea to create the whole world. Why not? People live there! I find maps very inspiring and I love the concept of travel. It is so cool to me all of the different ways that people manipulate them so I thought I would try my hand at it. I really wanted to try something that I had never tried before and I thought of doing a weaving. I received many warnings against doing a weaving, let alone a weaving of the ENTIRE WORLD, however, I thought, how bad could it be? Turns out, this would be my most difficult project to date.
I printed out a map the size I wanted to create it, but following the pattern and getting the correct proportions proved to be extremely difficult. Certain countries were getting smaller while others were growing. Also, the sides started scrunching inward, which also distorted the shape. I really did not want to waste all of the tedious work I had put in by making it messy so I tried really hard to make it as neat as possible. The work took a really long time but I am extremely happy with how it turned out. I am happy that I took a risk and did something completely unique, but if I were to do something like this again, I would probably pay even more attention to the detail. I probably would have put in more of the small islands as well, I was just getting frustrated at some points. I like the color scheme that I chose as well because I really think it works really well together. I think the message I wished to portray really came across of how we all may be different but we all live in this same great big place. This piece was definitely a challenge but I am glad that I pushed myself beyond what I thought I could do.
I printed out a map the size I wanted to create it, but following the pattern and getting the correct proportions proved to be extremely difficult. Certain countries were getting smaller while others were growing. Also, the sides started scrunching inward, which also distorted the shape. I really did not want to waste all of the tedious work I had put in by making it messy so I tried really hard to make it as neat as possible. The work took a really long time but I am extremely happy with how it turned out. I am happy that I took a risk and did something completely unique, but if I were to do something like this again, I would probably pay even more attention to the detail. I probably would have put in more of the small islands as well, I was just getting frustrated at some points. I like the color scheme that I chose as well because I really think it works really well together. I think the message I wished to portray really came across of how we all may be different but we all live in this same great big place. This piece was definitely a challenge but I am glad that I pushed myself beyond what I thought I could do.
Origami Documentary
I really enjoyed the documentary on origami. As one of the artists mentioned, most people simply think of origami as the elementary folding of cranes and butterflies. This documentary helped me to truly understand the complexity of the art of origami. I did not know how much geometry and complex math went in to planning a piece of origami. I can barely fold a crane let alone a transformable sculpture that moves.
My style of art is much more free and unpredictable, so I guess I don't appreciate the idea of making something so precise and something that can be made multiple times. One artist said that he was "driven by the mathematics." Again, this was confusing for me because I think art should be used to express oneself and should not be planned that much. I can appreciate however how much effort and time they put into these elaborate pieces.
I like how each of the artists that was featured had their own style. It is a very unique form of art and so to see how each artist expresses him or herself through that is really cool. A lot of them talked about how where they came from and how that played into their work.
It was also really neat to see how many applications there were to origami such as in technology, science, medicine, etc. I did not appreciate however that one artist said that they were "practical applications." I think all forms of art are practical in some way and not just the forms that contribute to the science world. It was very interesting to see how the two play together, however. Overall, I learned a lot from this documentary as it broadened my perspective on this unique form of art.
Pit Fired Practice
|
|
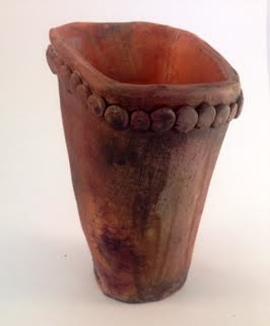
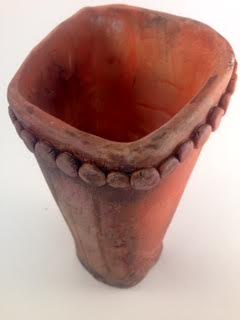
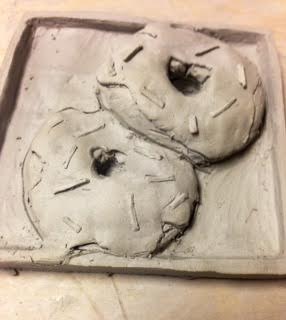
We were asked to design a mini cup in clay after being shown a demo on how to make a simple juice cup. I chose to make mine a little more unique than just the basic cup by squaring out the edges and making a decorative border. Getting the proportions of the cup right and each side to be even was definitely a challenge but I am glad I chose to make my vessel different.
After the piece was fired, I prepared the piece to be pit fired. Wrapped up in tin foil, the vessel also got salt, various leaves, copper wiring, and other random items added to it. There was no real planning involved, I just sort of found items I thought were interested and hoped for the best. I was not involved in the actual pit firing process, but when I received my piece back, the items had made super cool marks all the way around and on the inside. You can see the areas of texture where the wiring was placed and the effect the salt had as well. The pit fire also created a really neat coloring to the piece.
I really enjoyed this process because I had no idea how the piece would turn out and that was the fun of it! It was cool to let another natural cause take it's course and not simply what I chose to do with it. I would love to try this technique again maybe on a larger piece.
Mold Practice
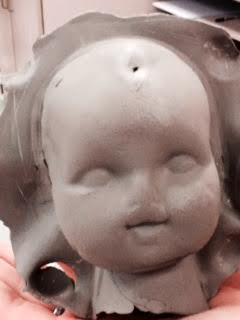
We were introduced to a new technique for working with clay: molds. As weird as it may be, my partner and I chose the small baby head mold. First, we had to roll out two slabs of clay and then we placed them into either side of the mold. It was challenging to get the clay into all the crevasses without breaking the clay, but once we did, we placed the molds together and pressed them so the sides would stick together. You are supposed to let the mold sit for a few minutes but we were running out of time so we definitely rushed the process. As you can see, the baby head did not turn out very well, most likely because we were not precise enough. We decided to just accept the flaws though and leave it as it is, as the piece has a lot of character, and the class all got a good laugh. After doing this quick practice with the mold, I am not a huge fan. I do not really like how the molds do not allow for a lot of creativity and all of them turn out very similarly. I think I would like to try it again sometime to get more of a feel for it. Maybe next time it wouldn't turn out so funny ;)
Relief Project
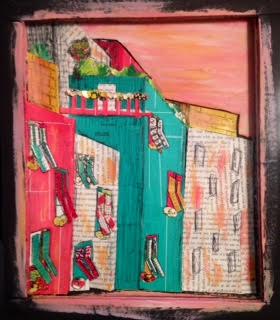
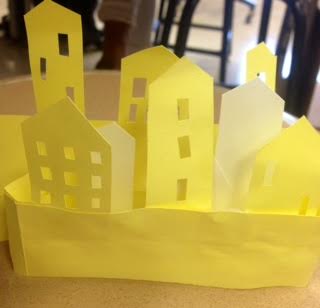
I was so excited to have the opportunity to create a full size relief piece. To take advantage of the opportunity, I really wanted to create something unique. I recently returned from a trip to Europe and was so inspired by the famous colorful buildings in Cinque Terre Italy. I immediately thought of the layered effect of the buildings and how cool it would be to recreate that using relief. I love working with paper so I knew I wanted to incorporate that in some way.
I began by making a Styrofoam frame to house all the paper and have something to do the carving in part of the relief. I used old magazine pieces to build up the shapes of the buildings and create the layered look. I also manipulated the paper to create the shutters, balcony, plants, etc. Once I had placed the paper in all the right places, I used a fine tip pen to highlight some of the shadows and add some contrast between the papers. Finally, I painted the background and added some paint in various places to tie it all together.
Going into the project, I didn't really have a plan beyond the paper so it was kind of challenging to make it up as I went along. I really learned a lot throughout it though. I learned about color schemes and texture variation. I learned about turning strange and different papers into something new. I learned how to meet challenges as they showed up and turn it into something that I am really proud of. For my first official piece in sculpture class, I think it turned out really well and I am excited to see what else this class has in store!
Mini-Projects
We were introduced to the concept of relief which when a piece has been carved into in places and has had stuff placed on top in other places. To get used to this new concept, we were asked to do a series of mini-projects using various materials.
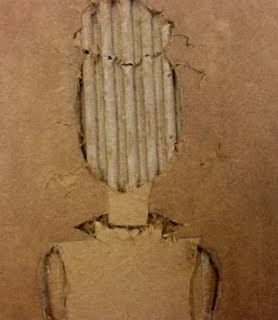
Cardboard Relief
For the cardboard relief piece, I learned to experiment with different layers of the cardboard.
Each layer provides a different texture that really contributes to the overall effect of the piece.
Each layer provides a different texture that really contributes to the overall effect of the piece.
Paper Relief
For the paper relief, I practiced on a couple different pieces. It involved manipulating the paper
in unique ways by cutting it, folding it, and gluing it down.
in unique ways by cutting it, folding it, and gluing it down.
Clay Relief (Not fired)
For the clay relief, I began with a clay tile that I carved down into and then added
additional pieces on top. This one was my favorite because I felt that I got to be very creative.
additional pieces on top. This one was my favorite because I felt that I got to be very creative.
I really enjoyed the opportunity to do some mini projects because I got to explore mediums that I am not very familiar with but without much commitment. I learned a lot in the short periods of time it took to complete each project. I can not wait to do a larger relief piece soon!
Styrogami
|
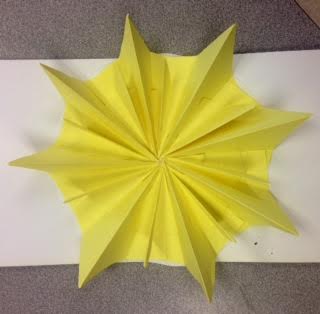
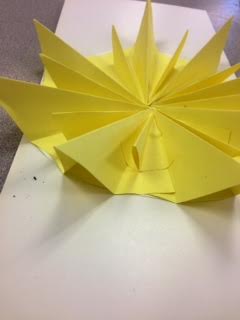
For our first mini assignment, we were given two styrofoam cups and an exacto knife. That's it. After being introduced to the concept of styrogami, we were tasked with coming up with a unique design that could be produced with simply the tools in front of us. I hadn't done anything 3-dimensional in a long time, so at first, this assignment intimidated me a little bit. I had an image of this quirky, abstract little sculpture but I couldn't seem to get the vision from my mind to my hands.
Creative block prevented my mind from coming up with anything more inventive than a flower pot. Lame, right? The cup already looks like a flower pot. A kindergartener could tell you that. So I flipped it upside down. And there I had an upside down flower pot with flowers growing from who knows where. I guess you could say I learned to always look at things from a different perspective ;) Once I had an inspiring idea, the actual piece was easy to create, as I was eager to practice maneuvering the knife in the styrofoam to create something brand new. I learned a lot about looking at things in not so obvious ways and making them my own. A lot of people would have looked at the cup and seen a cup. Or maybe a flower pot. But I was really able to stretch my imagination a little bit and create something that I am really proud of! |
Inspired Sculpture Artist
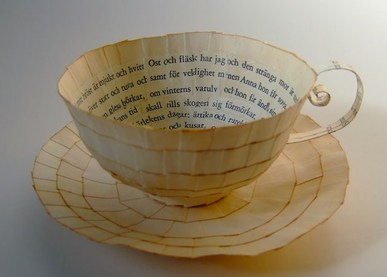
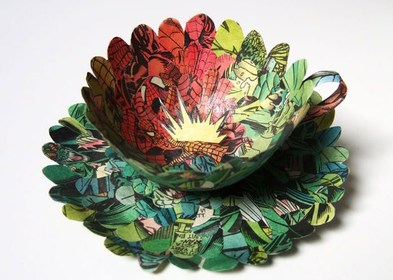
I am inspired by the artist Cecilia Levy. This Swedish artist is known for her inventive usage of the most basic papers such as old book pages and comic book pages. She creates objects such as bowls, plates, and saucers by organizing the paper in different forms. Levy has a background in graphic design, so is used to the creative scene; however it was not until 2009 that she discovered the art of dissecting books. She says about her works that "The story lives on, but in a different shape."
I find her work very inspiring because I love the concept of turning something old and unwanted into something beautiful. Most people would look and see pieces of old paper, yet she saw them as stories waiting to be told in a new light. Her impeccable work continues to tell the story, just in a new way. This concept is very inspiring to me, as I am encouraged by her inventiveness and out-of-the-ordinary approach to this well-known form of sculpture.
Some of her work can be found below, and more can be found at http://www.cecilialevy.com/